LaurasPills

LaurasPills

giovedì 31 maggio 2018

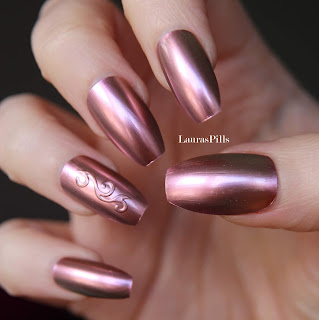
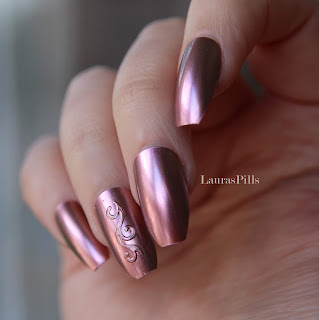
Gold rose chrome mirror liquid nail polish from Born Pretty Store


Hello,
Today we will be testing out a nail product I have been wanting for a loooooong time!
It has to do with the mirror chrome trend!

The mirror nails was a huge trend in the nail art world in the few last years. But it needed specific tools and more steps to be completed.
The magic mirror effect was created with a very fine powder that you rubbed onto a base colour. The sad thing was that a normal top coat would have ruined the chrome effect so this look was available only for UV gel users or in salons or with a special trick (that I have shown you a few moths ago in this video).

For all the lazy nail art addicted out there the nail industry came out with a great product that can make us save money and time (more preciuos than money!)
It is liquid mirror reflect chrome polish from the company Born Pretty Store!
It is a unique formula that guarantees a mirror effect look in a few simple strokes.

 If you decide to give this product a try please don't forget to use my coupon code, it will give you another 10% off:    RASX31 on www.bornprettystore.com


These are the application instruction
How to use:
1. Use File and buffer to let your nails get a smooth surface and remove oiliness
2. Apply one coat of base coat, wait it dry
3. Shake the bottle before use to let the color be even
4. Apply the metal polish wait it dry

This polish need a special base coat to smooth the surface of the nail and make the result last longer.
I was so dumb that I did not take the base coat so I ended up tring this nail polish on false nails and for a long lasting result I used a water base nail polish from Little Ondine and it worked perfectly.


I am not able to tell you how long the colour will last on natural or false nails because this was my first time testing, I will let you know in the future.
I think it can last one or two days because it is not a normal nail polish, but it is so beautiful that it worth the effort.
The bottle contains 9 ml, a lot of product.


As I said before it is different from a normal nail polish and the consitency will surprise you, it is very thin and liquidy. When you first apply it it won't look mirror at all, but if you wait a few minutes you will see the amazing transformation: a prefect mirror chrome effect, not stricky, perfectly even and shiny. It is very important to shake well the bottle before applying it and it takes just one coat for full opacity.
Born Pretty did an amazing job with this product and it is not expensive at all compared to the ones are out in the market.

I picked a gold rose colours " Get a Penny" and it is stunning, there are others 6 shades, all amazing it was so hard to choose just one!

In the next post I will show you a tutorial to create the 3d embossed effect that you can now see on the ring nail.


mercoledì 30 maggio 2018

Radioactive monster nails! Luminous powder from Beauty Big Bang


 Another glow in the dark nailart with the nail polish I have made diy with the luminous powder  from Beauty Big Bang.
At first I wanted to create some lightning in the night but the final resul was similar to some radioactive or monster nails! :-) I don't know it turn out different form was I imagined in my mind.
I think this look would be perfect for Halloween.


  The item Id is SKU: J2103-3A
The site has a free shipping worldwide, they also make very nice offers too and, if you need some extra help, you can use my discound code LAURA  for 10% off  on your order.

Il codice di identificazione del prodotto è : SKU: J2103-3A
Il sito ha le spese di spedizioni gratis in tutto il mondo e spesso ci sono offerte convenienti e se avete bisogno di un incentivo extra c'è il mio codice di sconto LAURA per avere il 10% su qualsiasi prodotto.


Glow in the Dark watercolour/smoke effect!


Hello there,

you already know that I have a special love for glow in the dark items
I have been looking for glow in the dark nail art supplies that not only were luminous in the dark but had colours too and finally I found them on Beauty Big Bang online store.
The company sells many glow luminous powders in many colours, you can choose between 
12 colours. I picked a light blue colour. 
This product comes in a plastic bag.
Remember that each of these powder is like a battery that charges and discharge at the same time. They constantly need charging to keep glowing. Natural or Artificial light is the main source of charge. The glow effect lasts a few minutes.
This product can be used on just about anything you can think of from slime, candle making, diy project, paintings, etc.


Ciao a tutti,
come saprete già ho una passione speciale per gli oggetti che si illuminano al buio. 
Da molto tempo sto cercando dei prodotti che non solo sia luminosi al buio ma che abbiano anche una tonalità di colore accesa, e finalmente li ho trovati sul negozio online di Beauty Big Bang
Questo brand ha in vendita delle polveri che si illuminano al buio, si può scegliere tra ben 12 colori. Io ho scelto un blu chiaro.
Il prodotto è confezionato in una bustina di plastica. 
Ricordate che ognuna di queste polveri si deve ricaricare come se fosse una batteria che si carica e scarica allo stesso tempo. Hanno bisogno di costante ricarica per continuare a splendere. La luce artificiale e naturale è la principale fonte di carica. L'effetto luminoso dura qualche minuto.
Questo prodotto può essere usato non solo sulle unghie ma anche per progetti fai da te, dallo slime alla creazione di candele, pittura etc..


The item Id is SKU: J2103-3A
The site has a free shipping worldwide, they also make very nice offers too and, if you need some extra help, you can use my discound code LAURA  for 10% off  on your order.

Il codice di identificazione del prodotto è : SKU: J2103-3A
Il sito ha le spese di spedizioni gratis in tutto il mondo e spesso ci sono offerte convenienti e se avete bisogno di un incentivo extra c'è il mio codice di sconto LAURA per avere il 10% su qualsiasi prodotto.


You can use this powder in many ways you can directly apply it on nails, over a wet base of nail polish or mix it to acrilyc or nail polish. 
I decided to create my own glow in the dark nail polish. The process is very simple. You can use any bottle of clear nail polish. In this case I used a matte top coat from Kiko. 
Using a coloured polish is not advised because the polish pigment will cover the luminous power and it will not glow as much.
I cut and corner of the powder bag to make a small opening and I carefully poured it in the nail polish bottle. The last step is to close the cap thitghly turn and shake the nail polish to even the mix. You can even mix it with a toothpick. 

Potere usare questa polvere in molti modi: potete applicarla direttamente sulle unghie sopra uno strato di smalto non asciutto o mischiarlo ad acrilico o smalto.
Ho deciso di creare il mio smalto glow in the dark. Il processo è molto semplice e intuitivo. Potete usare qualsiasi smalto trasparente. In questo caso ho usato uno smalto opaco della marca italian Kiko.
Non è raccomandato usare uno smalto colorato per questa operazione perché il pigmento dello smalto coprirà il potere luminoso della polvere e non brillerà molto al buio.
Ho tagliato il bordo di un angolo della bustina in plastica per creare una piccola apertura, ho versato la polvere nella boccetta di smalto. L'ultimo passaggio è quello di chiudere il tappo e girare e scuotere la boccetta per miscelare il composto. Potete aiutarvi con uno stuzzicadenti se necessario. 


I wanted to create something special with this product, so I decided to go for a watercolor/smoke effect  on a black base. I gradually added layers of thin acrylic paint in white and different shades of blue, I added a coat of glow in the dark polish only in the center part of the nail.

.

Per mostrarvi questo prodotto volevo creare qualcosa di speciale sulle unghie, per questo ho deciso di creare un effetto acquarello/fumo su una base nera. Ho aggiunto gradualmente strati di colore acrilico diluito in differenti tonalità di blu, dal più chiaro al medio scuro. E infine ho coperto la parte centrale dell'unghia con lo smalto.  


lunedì 28 maggio 2018

Rainbow unicorn! Holo flakes and waterdecals from Beauty Big Bang


Hello,
Everybody loves unicorns! I can't really have enough of it!
The unicorn appeared in early Mesopotamian artworks and was referred to in the ancient myths of India and China, according to Encyclopaedia Britannica. It's also Scotland’s national animal.
Today, the modern day unicorn trend has seen a surge of novelty products embrace its most prominent feature – the long, pointed, spiralling horn protruding from its forehead, and the wavy mane, of course.

 The 2017 was very much a realisation that the unicorn trend was on course for world domination, I am sure nobody excaped the unicorn trend and have at least one item in your house or wardrobe with a unicorn shape or print.

So my mission is to add  new unicorn nailarts to the world!

Ciao!
Tutti amano gli unicorni! Anche a me piacciono e non riesco a farne a meno.
Secondo l'enciclopedia Britannica la figura dell'unicorno apparve nelle prime opere d'arte dell'umanità in Mesopotamia ma il mito era risalente alla Cina e all'India. L'unicorno è anche l'animale nazionale della Scozia.
Ai giorni nostri il trend degli unicorni ha subito un'ondata di novità, i prodotti si riferiscono alla sua iconografia più recente ovvero il corno appuntito e a spirale che spunta dalla fronte, e il crine ondulato e colorato. 
Il 2017 è stato l'anno in cui il trend degli unicorni ha dominato il mondo. Sono sicura che nessuno sia riuscito a scampare a questo trend e abbia almeno un oggetto in casa o nel guardaroba inspirato alla forma o con stampe di unicorno.

Quindi la mia missione è di aggiungere altre nail art unicorno al mondo!


The nailart industry went crazy about unicorns and we have beautiful and creative products to use on our nails.
The company Beauty Big Bang sent me some wonderful product to test for you.
For this nail art I decided to use two products that in my opinion are perfect together:
a set of unicorn waterdecals  and the flakie powder from Beauty Big Bang.

You can choose between 8 different designs all unicorn related or pick them both.

L'industria della nail art è impazzita per gli unicorni e quindi abbiamo la fortuna di avere innumerevoli prodotti da usare sulle nostre mani.
Il negozio online Beauty Big Bang mi ha inviato alcuni meravigliosi prodotti da testare per voi.
Per questa nail art ho deciso di usare due prodotti che secondo me si accordano perfettamente: un set di decalcomanie a tema unicorno e una polvere di scaglie iridescente/holografica 


 The item Id is SKU-J9907-6C
The site has a free shipping worldwide, they also make very nice offers too and, if you need some extra help, you can use my discound code LAURA  for 10% off  on your order

I choose the most whimsical and colourful one.
There are multiple shape of unicorns in a watercolour/ universe pattern with all colours of the rainbow. There are also beautfiul unicorns heads in pink and purple. There are other shapes too such as hearts crosses, triangles and quotes.

Il codice di identificazione del prodotto è :SKU-J9907-6C
Il sito ha le spese di spedizioni gratis in tutto il mondo e spesso ci sono offerte convenienti e se avete bisogno di un incentivo extra c'è il mio codice di sconto LAURA per avere il 10% su qualsiasi prodotto. 

Tra i vary waterdecals ho deciso di scegliere i più stravaganti e colorati. Come potete vedere dalle foto ci sono molte forme di unicorno colorate in una fantasia a metà tra effetto galassia e acquarello, tutti i colori dell'arcobaleno sono rappresentati. Ci sono anche alcune bellissime teste di unicorno in toni rosa e viola. Sono presenti anche altre forme come cuori, croci, triangoli con brevi frasi.


The application is very easy.
The waterdecals are protected by a transparent sheet. You can select the size and the design you want, cut it with a scissor. Don't forget to remove the plastic sheet. Cut out the section of decals, and let it soak in room temperature water for about 20-30 seconds, slide the decals off the paper backing with tweezers and place on the nails with the white base coat
The instructions suggest to place it on  the nail and blow dry. The last step is to secure it with clear nail polish. In my case with a clear glossy top coat.

L'applicazione è molto semplice.
Le decalcomanie sono protette da una pellicola trasparente. Sì può selezionare la taglia e il design che si vuole con una forbice. Non dimenticate di rimuovere lo strato di plastica, e immergere il frammento nell'acqua a temperatura ambiente per 20-30 secondi, separare la decalcomania dal retro in carta facendola scivolare, prelevarla con delle pinzette e posizionarla sulle unghie precedentemente dipinte con lo smalto. Le istruzioni suggeriscono asciugarla con un phon per capelli dopo l'applicazione. L'ultimo passaggio è quello di applicare un top coat per proteggere la nail art, nel mio caso un top coat a finitura brillante.


I think these kind of decals are great on light or white nails that's why I've chosen white coffin nails.


Then I thought I could add some holographic flakies. I tried to do a base with a rainbow watercolour effect mixing some acrylic paint on the nails, then I applied a layer of clear polish and the flakies dabbing with sponge applicator.
I fell in love with this magic chameleon flakes! It has a really fantastic effect: it is a mix of large flakes, and really tiny ones. I picked the shade number 10 A that as you can see from the picture has a bit of purple and blue.
There are 14 different colours to choose from and the jar contains 0.2 gr.
All the jars come with a sponge applicator which is very easy to use.


Credo che questo tipo di decalcomanie diano il meglio su basi chiare o totalmente bianche, infatti ho scelto di applicarle su uno sfondo bianco.

Per aggiungere un tocco in più ho pensato di aggiungere alcuni flakes holografici. ho cercato di replicare su una base bianca un effetto acquarello nei colori dell'arcobaleno, ho mischiato dei colori acrilici molto diluiti poi ho lasciato asciugare e ho aggiunto uno strato di smalto trasparente e poi la polvere holografica picchiettando con l'applicatore in spugna. 
Sono rimasta stupita da questi glitter holografici! L'effetto che creano è veramente fantastico: sono un mix tra scaglie grandi e particelle più piccole. Io ho scelto la tonalità 10 A che come potete vedere ha un po' di blu e di viola. 
Ci sono ben 14 colori tra cui scegliere e i vasetti contengono 0,2 gr.
Tutte le confezioni contengono un applicatore in spugna molto semplice da usare.


                                                             SKU: J6457TM-10A


They look amazing in direct sunlight:


sabato 26 maggio 2018

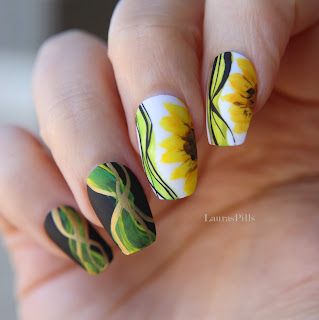
Sun flower nailart tutorial with beauty big bang nail brush


Hello!
I have recently received a nail mail from the online store Beauty Big Bang. They have the best nail products. It is a global online retailer for all things beauty related, including cosmetics, nails, hair, health care and so on. Its motto is ‘Make a bigbang of beauty, you’re the beauties’.
The site support PayPal as payment method, there is free shipping worldwide over 1 item. the avarage delivery time is 2-4 weeks.

I really like free hand nail art, but sometimes it is very hard to learn how to do a beautiful design on all nails, if you are in a rush this can be time consuming too.

We are extremely lucky, in fact some tools can make our work easier.
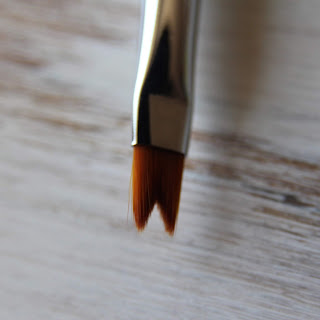
This brush from Beauty Big Bang is brilliant and very easy to use. It has a bifurcated shape that is expecially made to paint flower petals or astract shapes. I think this can be used for 3d nail art too with molding powder.

The brush hair is very thik and flexible, it is perfect to draw flowers or small details of patterns.

Ciao a tutti!
Recentemente ho ricevuto una nail mail dal negozio online Beauty Big Bang. Questo sito online è pieno di prodotti interessanti. È un rivenditore globale di prodotti per la belllezza e la cura della persona, vi si possono trovare cosmetici, trattamenti per capelli, ugnhie etc. Il loro motto è "Create un Big Bang di bellezza, voi siete le bellezze".
Il sito accetta paypal come mezzo di pagamento, se si acquista più di un prodotto le spese di spezione sono gratis e i tempi di spedizione variano dalle 2 alle 4 settimane.

Mi piacciono molto i decori per unghie a mano libera ma a volte è molto difficoltoso imparare a realizzare un bel disegno su tutte le unghie, soprattutto ci si impiega molto tempo.

Ma ultimamente siamo molto fortunate, l'industria sforna sempre strumenti che ci rendono la vita più facile. 
Questo pennello di Beauty Big Bang ne è un esempio in quanto il suo uso è facile e veloce. Ha una forma biforcuta che è creata proprio per dipingere petali di fiori o forme astratte similari.
Credo che possa essere usato anche per nailart 3D fatte con la polvere modellante.
Le setole sono molto fitte e flessibili, la forma sembra perfetta per disegnare fiori o piccoli dettagli.


 The item Id is SKU: J5677-5C
The site has a free shipping worldwide, they also make very nice offers too and, if you need some extra help, you can use my discound code LAURA  for 10% off  on your order


It has also an elegant packaging in a fancy magenta pink colour with silver details.

It has a beautiful cap in the same colours that protect the brush and make it easier to store and collect. The handle also is very fancy, it is trasnparend and filled with beads

Il design del packaging è veramente bello, in un colore rosa magenta con dettagli in argento.
Ha un cappuccio nello stesso colore per proteggere le setole e per riporlo facilmente in cassetti o astucci senza rovinarlo. L'impugnatura è molto elegante, trasparente e impreziosita da perline.


I think this brush has the perfect shape for a sunflower. This is the main inspiration for this nail art and here it is a short video tutorial that show you how easy it is to make sunflower petals and shapes.
I started painting the shape of a sunflower, then I painted the dark center in a brown and dark orange shade.
I decided to add some abstract stripes and lines to reminds the big and tall stalk of this flower.
The finest lines are painted with a striping brush.

Questo pennello ha la forma perfetta per realizzare la forma di un girasole! Proprio questo fiore ha ispirato questa nail art. Nel breve video tutorial qui sotto vi mostro come è semplice dipingere i petali di un girasole !
Ho iniziato dipingendo la forma del fiore in un giallo scuro poi ho dipinto il centro del fiore in un arancione scuro e marrone.
Ho deciso di aggiungere alcune forme astratte che ricordassero il lungo stelo di questa tipologia di fiori. Le linee più fine sono realizzate con uno striping brush.  


giovedì 3 maggio 2018

Lace bracelet diy tutorial and jewelry kit review

Hello,
Today I would like to talk about something new. Some of you might know that besides nails I really like making jewelry too.


I always struggle to find good jewelry findings at a good price. If you buy pieces separately you might pick the wrong colours or forget something.
If you are beginners you might be interested in buying a jewelry diy kit.
This one from the online shop To Save www.tosave.com  is very useful and versatile.

Here is a small video tutorial to show you how I used this jewelry kit.


You can find it at this link:
http://www.tosave.com/p/200pcs-Jewelry-Making-Starter-Kit-Earring-Bracelet-Necklace-Findings-Crafts-DIY-182989.html

The kit contains everything you need to create professional looking bracelet, necklace, chokers and many other things.


 They offer a wide variety of different brass stampings and findings, all with a beautiful vintage deep brown patina. They also offer components in a golden silver, white silver.  These are very high-quality products for an exceptional great value if you buy them wholesale directly from the website. I love that they are constantly coming out with new products!


All pieces come in a nice  plastic box very easy to open and store. This is a great kit for parties and bridal showers or just girls night out or hanging with your children at home doing diy project.

The box contains:

20pcs x Jump Rings 5mm

20pcs x Jump Rings 6mm

20pcs x Jump Rings 8mm

20pcs x Crimp Ends 5mm*9mm

20pcs x Drop End Pieces 7mm

20pcs x Lobster Clasp 12mm*6mm

20pcs x Extender Chain 5mm

20pcs x Ribbon Crimps 6mm

20pcs x Ribbon Crimps 10mm

20pcs x Ribbon Crimps 20mm


As you can see from the pictures all pieces are high quality.

To Save stamping plate review


In my row of stamping plate reviews, I have reached a new brand To Save the online shop ww.tosave.com. that offered me to try some new products.
I always want to try new nail art tool so here I am with the review!


The plate includes 10 different larger designs (1.2 x 1.5cm each) and 9 smaller design engraved on to the stainless steel image plate and covered with a protective film to be removed before use. The image plate measures 6.5 x 12.5cm.


 The ten larger images are bigger than most common plates on the market, I am sure that they are carefully made to ensure almost any size nail. Every design is very detailed in order to be suitable even to tiny nails. I like the choice of adding smaller designs for small nails or layered nail art.

The main theme is mandalas. A mandala is a spiritual and ritual symbol in Hinduism and Buddhism, representing the universe. In common use, "mandala" has become a generic term for any diagram, chart or geometric pattern that represents the cosmos metaphysically or symbolically; a microcosm of the universe.


How to use:
1) Remove the blue protective film.
2) Apply the Nail Polish of your choice to the design you wish to stamp.
3) Remove the excess nail polish with a scraper using a 45° angle.
4) Roll the stamp over the selected design being careful not to use too much pressure.
5) Transfer the design by rolling the stamp over you nail.
6) Apply a top coat for a longer lasting result.

As base I used some stiletto false nails that you can buy at this link

http://www.tosave.com/p/600Pcs-NaturalWhiteClear-Artificial-Sharp-Nail-Art-Tips-Pointy-Fake-False-Nail-109578.html

For the stiletto shape is very easy to obtain a coffin/ballerina shape. You simply have to cut the point and file the nail.
I used a silver nail polish to stamp and the I added to rhinestones on the middle and ring finger.


I hope you'll love the result!