LaurasPills

LaurasPills

venerdì 30 marzo 2018

Daisies on nails! Clear jelly metal stamper tutorial and review


Hello!
Today I would like to show you a nail art that is an attempt to get out of my comfort zone.
 I really like spring but I am not a big fan of pastels colours on nails. I like them on darker skin tone but I don't think they suit my porcelain skin.
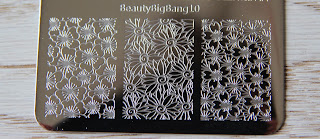
I received a beautiful plate from Beauty Big Bang and I could not resist trying a floral spring nail art.
I reveal in advance that there will be a blog post all about this wonderful floral plate (id code: J6 401TM-4A)  that you can find at this link:


Ciao a tutti!
Oggi vi mostro una nailart che va un po' fuori dalla mia comfort zone.
Mi piace la primavera ma non vado matta per i colori pastello sulle unghie. Mi piacciono molto in contrasto con carnagioni scure ma credo non si accordino bene con la mia pelle di procellana.
Ho ricevuto una bellissima placca per stamping dal sito Beauty Big Bang e non ho resistito ad una nail art primaverile e floreale. 
Vi anticipo già che ci sarà un intero post dedicato a questa placca per stamping a tema floreale (id code: J6 401TM-4A) ma ve la mostro nelle foto e vi dico che potete trovarla a questo link:
https://www.beautybigbang.com/products/sun-floral-nail-stamping-plate-rose-flower-pattern-nail-accessory


For this nail art I picked the two daisies designs. I think they are so flattering and delicate.

The most important tool for this nail art is the Metal Nail Art Stamper & Scraper (id code: J2914TM-1A).  I love stamping nail art and I am always eager to find tools and tricks that could make the process easier and faster.
I've tried a lot of clear stamper before and I think this one is great.

Da questa placchetta ho scelto le due immagini con le margherite. Creso siano delicate e femminili.
Ma lo strumento più importante per questa nail art è lo stamper trasparente in metallo .
Amo la tecnica stamping e spero sempre di trovare strumenti e segreti che rendano il processo più semplice e veloce.
Ho provato molti stamper trasparenti in precedenza ma credo questo sia molto buono.


It is very large, it measures approx 4cm (1,5 inches), this means that you can use it for longer nails and larger designs. It has a nice cap with the brand logo that protect the jelly clear head. This is a great idea because it is easier to store it, I'm always worried to damage the jelly head. The plastic head looks resistant and very soft at the same time, so it will follow even the most curved nails.
To tell the truth the first thing I noticed about this stamper is its holder, it has an ergonomic design so you can easly grip it.
It is in metal and you can even choose between more colours: Gold,Pink,Silver,Blue.

You can find it at this link:
https://www.beautybigbang.com/products/2pcs-set-jelly-nail-art-stamping-metal-stamper-scraper-nail-seal-stamp-tool

If you want to give this product a try, you can use my discount code LAURA for 10% off the entire site www.bigbangbeauty.com

E' più grande della media, misura 4 cm circa, questo significa che potrete usarlo senza problemi per unghie molto lunghe e immagini più grandi.
Ha un cappuccio di protezione per la parte molle dello stampino. La trovo una trovata utile e geniale, mi permette di conservalo con facilità senza paura di danneggiarlo.  
La parte in plastica jelly sembra molto resistente e morbida allo stesso tempo, così da seguire la curvatura naturale delle unghie.
A dirla tutta, la prima cosa che mi ha colpito di questo stamper è l'impugnatura ergonomica che facilita la presa. E' in metallo e potete persino scegliere tra vari colori: oro, rosa, argento e blu.

Lo potete trovare a questo link:
https://www.beautybigbang.com/products/2pcs-set-jelly-nail-art-stamping-metal-stamper-scraper-nail-seal-stamp-tool

Se volete provarlo potete usare il mio codice sconto LAURA per il 10% in meno in tutto il sito www.bigbangbeauty.com


It comes in a nice bag with the scraper that has the brand logo and a nice fesitve design decoration. The scraper is quite thin and flexible.

As you can see from pictures it picks up the images very well and with no effort.

Insieme allo stamper riceverete anche lo scraper (il raschietto usato per togliere l'eccesso di smalto dalla placca), che è trasparente con il logo del negozio e una decorazione natalizia.

Come potete vedere dalle foto traferisce le immagini molto bene e senza particolare sforzo.


You don't have to file it or mattify it with pure acetone otherwise you will make clear head foggy and unclear. If the head became a bit greasy you can wash it with dish soap.

These kind of clear stamper are perfect for advanced or reverse stamping technique.
So that's exactly what I did for this nail art.
It is very easy even if it require a bit of patience
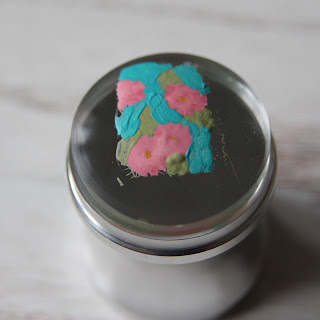
Once you have the design on the stamper head you can  apply a non-fast drying top coat over the entire image on the stamper and allow to dry. This will create a base. When it completely dried you can start filling the design with a dotting tool or a thin brush, you can use different colours for a better result.

Non è necessario opacizzalo con acetone, anzi lo sconsiglio in quento renderebbe la parte in plastica opaca e non completamente trasparente. Se avete l'impressione che sia un po' unto potete lavarlo con sapone per i piatti ed asciugarlo attentamente.


Questo tipo di stamper è perfetto per la tecnica di stamping avanzata (o reverse stamping).
Ed è proprio quella che ho effettuato in questa nail art.
E' un processo molto semplice ma richiede un po' di pazienza.
Una volta che avte l'immagine sullo stamper potete applicare uno strato di smalto trasparente fino a coprire l'intera immagine e lasciarla asciugare bene. Questo crearà una base. quanto questo strato è completamente asciutto potrete iniziare a colorare il disegno con un pennello molto fine o uno strumento per dotting. Usate colori differenti per un migliore risultato.


If you turn the stamper you can see the design! This is not possible with normal stamper! It is a big help because you can see in advance how it will turn out on your nail!

Come potete vedere dalla foto, se girate lo stamper potrete vedere l'immagine. Questo non è possibile con un comune stamper di vecchio tipo. Secondo me è di grande aiuto perchè potrete controllare lo stato dell'immagine e capire come sarà sull'unghia.


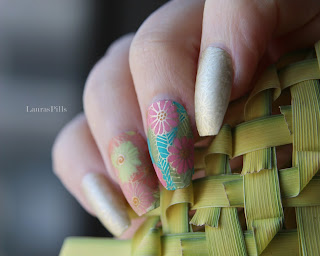
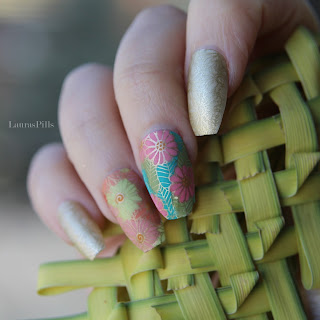
Using tweezers, gently peel off the image from the stamper. You’ve now created a custom nail decal that you can apply onto your nail with a clear nail polish!
On index and pinky I did a normal stamping with a gold colour.

Usate delle pinzette per staccare l'immagine dallo stamper. Avrete creato uno sticker fatto a mano che potrete applicate sulle vostre unghie con uno smalto trasparente.
Sull'indice e sul mignolo ho fatto uno stamping normale con un color oro.



giovedì 29 marzo 2018

String light nail art! Glow in the dark! Beauty Big bang luminous sequins review and tutorial


Hello!
Are you ready for something new?
I hope so!
Today I would like to show a product that I received from the Company Beauty Big Bang.

Here is a nail art and a nail product that will make your nail glow with no effort!

Ciao!
Siete pronti per qualcosa di diverso? Lo spero!
Oggi vorrei mostrarvi una nailart e un prodotto che mi ha mandato il negozio online Beauty big Bang.
Una nail art ed un prodotto che faranno letteralmente illuminare le vostre unghie!


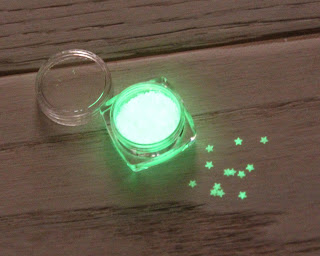
 These are some glow in the dark star shaped nail sequins. Aren't they cute??
They currently are on discount and you can have them for 1.62 euro. The product comes in a nice jar with approx. 1g of sequins. The sequins are really thin so you will have a many many stars to decorate your nails!

Si tratta di alcune paillette a forma di stella. Non sono carinissime?
In questo momento sono in sconto e potranno essere vostre per 1.62 euro. Sono contenute in un piccolo contenitore che contiene approssimativamente un grammo di prodotto. Queste stelline sono molto fine e vi assicuro che il barattolo ne contiene molte e che dureranno per molte manicure. 


This is how they look in darkness or semi-darkness.
 All you have to do is to to hold it under a light for few seconds and then it will glow in the dark (the effect won't last forever, but you can recharge it under a light again and again).

In questa foto vi mostro come sono al buio o in penombra.
Tutto quello che dovete fare è direzionarle verso una luce (naturale o artificiale) per qualche secondo poi spegnere la luce e loro brilleranno al buio (l'effetto non durerà molto ma potrete ricaricarle sotto una luce infinite volte).
  

If you want you can find this product at this link:

https://www.beautybigbang.com/products/glow-in-dark-nail-sequins-round-heart-star-thin-paillette-luminous-nail-glitter

Don't forget to use my coupon code: LAURA for 10% discount.

Potete trovare questo prodotto qui:
https://www.beautybigbang.com/products/glow-in-dark-nail-sequins-round-heart-star-thin-paillette-luminous-nail-glitter

Non Dimeticate di usare il codice LAURA per avere lo sconto del 10%.


I wanted to create something special with these nails sequins. I was really inspired by some pictures I found on pinterest and polyvore of some star lighting:

Volevo creare qualcosa di speciale con questo prodotto. Mi sono lasciata ispirare da alcune fotografie trovate su pinterest e polyvore che raffigurano alcuni fili di luci a stella.


West Aussie Wedding: Photography


 So I end up creating this:


 Here is a step by step tutorial to show you how I did it:
Ecco un tutorial step by step in cui vi mostro come l'ho realizzata:
 Step 1: Start with a black nail polish.
 Step 1: Partire da una base nera.

 2. Dip a fan brush in a dark blue shade and gently swipe it across the nail.. You don't have to be precise.
2. Intingere un pennello a ventaglio in un colore blu profondo e passarlo sull'unghia. Non si deve esser troppo precisi.

 3. With a striping brush, draw two lines across the nail in a silver shade (these will be the strings for the star lights).
3. Con uno striping brush disegnare due linee con un colore argentato (questi saranno i fili per le luci a forma di stella).


4. With a wax pencil or a dotting tool apply the star sequins over a wet nail polish.
4. Con una matita di cera o uno strumento per dotting applicare le stelline su uno strano di smalto trasparente non ancora asciutto.


 5. If you want you can trace over the strings with a glow in the dark nail polish. I used Essence glow in the dark top coat.
5. Se si vuole si può ripassare il disegno dei fili argento con uno smalto glow in the dark. Io ho usato il top coat di Essence.


Here is a small video to show you the effect in the dark!!!

Qui c'è un piccolo video che vi mostra l'effetto al buio


You can also use these sequins to decorate your phone case, stationey and even for body art!
I did a small jar full of stars! I glued some sequins on a silver wire!

Potete usare queste pailletes per decorare custodie per cellulari, cartoleria e persino per body art!
Io ho realizzato un piccolo barattolino pieno di stelline. Ho incollato alcune stelle su un filo argentato!


mercoledì 28 marzo 2018

Beauty Big bang gold flakies

Hello there!
I was contacted by the company Beauty Big Bang and they kindly offered me some products to try and review!
Beauty Big Bang is an online store where you can find nail supplies and and make up. They have a wide range of products and they offer free shipping worldwide. The company is based in Asia and the shipping time are around 3-5 weeks, you can pay with paypal.

Ciao a tutti,
recentemente sono stata contatta dall'azienda Beauty Big Bang che mi ha gentilmente inviato dei prodotti da recensire.
Beauty Big Bang è un negozio online dove si possono trovare strumenti ed accessori per nail art e cura della persona. Hanno una scelta di prodotti molto ampia e offrono spedizioni gratis in tutto il mondo. L'azienda ha sede in Asia e i tempi di spedizione variano da 3 a 5 settimane, si può pagare comodamente con paypal.


The first product I would like to show you is a gold flakes powder. These gold flakes (product IDJ2430-GD) currently retail for 1.61 euros and come in gold and silver.
I have used gold foil before but I was surprised to see how gold and bright these flakes are!

Il primo prodotto che vorrei mostrarvi è una polvere di scaglie dorate per ugnhie. Questo prodotto (IDJ2430-GD) al momento costa 1,61 euro e si può scegliere tra la versione dorata e la versione argento.
Ho già usato precedentemente della foglia d'oro per nailart ma sono stata piacevolmente colpita da questa versione molto più brillante e realistica.


The product comes in a nice jar that contains 0,2 gr of flakes and a double sided sponge applicator.
The flakes are extremely thin so you won't have problems for the application. They can be used with normal nail polishes and gel polishes as well.
You can buy the product at this link:
https://www.beautybigbang.com/products/1-box-gold-silver-glitter-aluminum-flakes-magic-mirror-effect-powders-sequins-nail-gel-polish-chrome-pigment-decorations

Don't forget to use my coupon for 10% off : LAURA before check out

Il prodotto è contenuto in un vasetto molto carino che contiene 0,2 gr di scaglie e un applicatore in spugna. Le scaglie sono molto sottili così da facilitarne l'applicazione. Questo prodotto può essere usato con smalti normali o smalti UV.
Potete acquistare questo prodotto seguendo questo link:
https://www.beautybigbang.com/products/1-box-gold-silver-glitter-aluminum-flakes-magic-mirror-effect-powders-sequins-nail-gel-polish-chrome-pigment-decorations

Non dimenticate di usare il mio coupon per avere lo sconto del 10%:  basta inserire LAURA al momento del pagamento


The application is very easy. You can dab the powder over a base nail polish. If you use the sponge applicator is very importsnt that you dab the product over a tacky polish. It has to be not completely wet but a bit sticky. When you are satisfied with the design you can seal it with a clear top coat.

L'applicazione è molto facile. Potete tamponare i glitter su una base di smalto. Se usate l'applicatore in spugna è molto importante che lo smalto non sia asciutto del tutto ma ancora leggermente umido. Quando sarete soddifatti con il risultato non dimenticare di fissare la nail art con un top coat trasparente


These nail flakes look so saturated and realistic that remind of gold leaf used on ceramics, that's why I decided to create a gradient base with a fan brush. The first version is in a rich shade of light blue.

It is very easy to achieve this look. I started with a white base. Then I used a fan brush, I dipped half of the brush in a white acrylic paint and the other half in a light blue paint.  You can swipe the brush across your nails, you can repeat this step many times to blend the colours together. In this case I didn't wanted it to be exemely precise and let the brush strokes visible.
Once the design has dried you can add a coat of nail polish and apply the gold flakes. I dipped a dry brush in the flakes jar and let them fall on the wet nail polish. then I sealed again with a clear top coat.
 Here is a small video to show you how to achieve this design:


La foglia d'oro è molto brillante e realistica, mi ha ricordato quella usata per decorare la ceramica. Per questo motivo ho deciso di creare una nail art in blu sfumando il colore gradualmente con un pennello a ventaglio. 
è molto facile realizzare questo effetto. Sono partita da una base bianca, poi ho intinto metà del pennello in un colore acrilico bianco e l'altra metà nel blu. Ho passato il pennello sull'unghia ripetutamente fino a sfumare i due colori. In questo caso non volevo essere troppo precisa ma lasciare che le pennellate si vedessero. 
Quando il primo strato è asciutto potete aggiungere dello smalto trasparente e passare all'applicazione della foglia dorata. Ho prelevato un po' di prodotto con un pennello e l'ho lasciato cadere in modo sparso sullo strato di smalto ancora bagnato. Infine ho fissato il tutto ancora con un top coat trasparente.


You can try different colours. In this variation I tried some pastels and seald the design with a matte clear top coat. As you can see the gold flakes did not lose their shine.

Potete provare colori divesi. In questa variante ho usato alcuni colori pastello e un top coat matte, come si può vedere dalle foto l'oro non ha perso brillantezza.