LaurasPills

LaurasPills
Visualizzazione post con etichetta white nails. Mostra tutti i post

mercoledì 27 marzo 2019

Blooming nail art! Ink/ watercolour effect


Hello!
As you know I have a special love for the water colours/ink effect nailart.
The technique is borrowed from the world of fine art an the result is stunning!
 I’m using the traditional method of ink that you would typically find when painting on paper, it doesn’t require precision.

The brand Born Pretty Store created a line of Blooming nail polishes for this purpose.

You can use my coupon code RASX31 for 10% off on www.bornprettystore.com

I have picked two colours the first one is:
BP-HI02 The Soul of Cloud, it is a light pink. In the bottle it appears as a clear orange, but it it will turn pink once you apply it on the nail.


The other colour I picked is the blue:
BP-HI01 The Glory of Star
A light blue that as the previous one appears a lot darker in the bottle.
link:
https://www.bornprettystore.com/born-pretty-bloom-nail-polish-whiter-purple-nail-varnish-manicure-design-p-44181.html


The clear polish for smudging is from Nicole Diary, a brand that Born Pretty Store sells on its online shop:
ND07
https://www.bornprettystore.com/nicole-diary-watercolor-marble-nail-blooming-nail-polish-nail-varnish-manicure-design-p-45546.html


These  nailpolish  formula is a lot different from normal ones, it more liquind and thinner and it has a different smell.

Here is a short video tutorial to show you how I used them


Prep the nail and apply two coats of white polish followed (Here I used a glossy top coat but It work better with a matte top coat because it create a better surface to apply colours). You have to careful and apply the white colour evenly with no any brush stokes visible. There should not be any lines on the surface.

When the white polish is completely dry you can start adding few drops of both colours.
Then I applied the transparent blooming polish from Nicole Diary to smudge and create the unique effect.

Let the colours blends and let it dry for a few seconds.

Add other coloured drops if you need to. DO NOT overwork the colors with your brush. Let it dry.

 Apply top coat to seal in the design. As you can see from the video with the top coat the colours will turn a bit lighter and saturated, Keep this in mind when you create  the design.


mercoledì 6 giugno 2018

Half moon spring nail art! Water decals from Born Pretty Store


Hello!
Today another nail art featuring some Born Pretty Store products, I've worked with them in the past and I love their nail products, they are affordable and their quality is amazing.
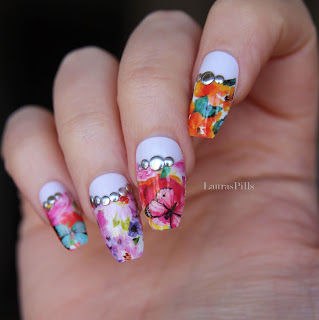
I really liked the set of floral water decals, there are 12 pattern in all colours and styles.
I picked design number A1378  a mix of colourful flowers and butterflies, these colours reminds me of summer or a sunny day in a country side. As you can see from pictures all designs are beautiful and extremely detailed. You won't be disappointed with them. 


The application is very easy.
The waterdecals are protected by a transparent sheet. You can select the size and the design you want, cut it with a scissor. Don't forget to remove the plastic sheet. Cut out the section of decals, and let it soak in room temperature water for about 20-30 seconds, slide the decals off the paper backing with tweezers and place on the nails with the white or nude base coat
The instructions suggest to place it on  the nail and blow dry. The last step is to secure it with clear nail polish. In my case with a glossy top coat.


If you decide to give this product a try please don't forget to use my coupon code, it will give you another 10% off:    RASX31 on www.bornprettystore.com


I decided to do a halfmoon cut, cutting a curved shape at the base of the water decal. Then I added some silver studs with a bit of clear polish and a dotting tool.


sabato 28 aprile 2018

Set of white stiletto nails! Review


Hello there,
this blog post is addressed to all of those people who tried many thing buy never succeded in having their nails on point! If you tried gel nails, shellac, acrylic nails and you nails got ruined or cracked and breaked anyway, you should consider trying press on nails.

I know many of you would turn their nose up but things have changed.
If you are a 90s kid like me you probably remember the first branded press on nails on the market, they were tragic and not so easy to wear, not natural looking at all.
False nails have come such a long way and they became the perfect compromise between beautiful and comfortable.


I have received some products to review from the online shop ToSave www.tosave.com .
I really wanted to try these white pointy nails. They came in a bag that contains 600 nails in 10 different sizes from 0 to 9. Nails are divided by sizes and you will have extra nails in size 4 and 5 because I think they are the most common sizes.


You can even choose a colour:
 - transparent if you like to paint them with sheer nail polish or want to try a french manicure or french nailart.
- natural a sheer, milky white beige, the perfect base for light or nude colours
- white if you need a base for nail art or want a fast and easy nails-to-go

I picked white of course!
The size range is very large the larger nail is 2,5 cm long and 1,4 cm wide, the smallest is 0,7 cm wide.


The shape is the classic stiletto, hte point is not as sharp as some other nails and I think it makes them more elegant and easy to wear. You might need a bit of filing to even the point or the edges but they are ready to wear.
You can apply them with some nail glue or nail tabs if you want to reuse the nails.

How to apply?
-Remove any nail polish. Clean and dry your natural nails.
-Find perfect size for each finger. File sides if too large or long.
-Apply a thin layer of nail glue to the underside of the nail tip.
-Apply the nail near your cuticle and hold in place for a few seconds.

They are quite sturdy and a bit flexible on the base so the can adjust to the natural curve of your nail beds.
You can also change the shape easily by cutting and filing. From this stiletto shape you can do a coffin/ballerina shape in just two steps (I will show you in another blogpost) or do an oval or square shape.

Here is how they look on hands. Amazing right?


If you don't like wearing false nails or you are so lucky that you don't need to you can still consider buying a set of these nails to use to practice nail art or swatch colours without stressing your natural nails. The set is really cheap!


If you like these nails stay tuned because I am going to post some nail art and nail art tutorial using these as base!

martedì 8 agosto 2017

Boho chic nails


Boho chic is a fashion trend that is a mix of bohemian and chic. It is part of the vintage phenomenom in fashion where the trend was to bring back old  styles for the modern era. Boho chic combines organic, colorful, detailed, folk-inspired  induments with simple, modern pieces. 
Sunshine and summertime activities always bring out my inner bohemian self and the love for light and whimstical pattern. 
I have recently received an amazing plate from Born Pretty Store (www.bornprettystore.com). This was perfect for the look that I had in mind.


If you want to buy it you can find it at this link:
http://www.bornprettystore.com/born-pretty-126cm-rectangle-stamping-template-floral-design-manicure-nail-image-plate-l051-p-36309.html


The stainless steel plate measures 6.5 x 12.5cm and have a vinyl backing for increased ease of use. Each plate comes in its own branded protective sleeve. The designs are engraved on to the image plate and covered with a protective film which needs to be removed before use.
The plate is made up by various sized designs, all representing mandalas or similar shapes, A mandala is a spiritual and ritual symbol. In common use, "mandala" has become a generic term for any diagram, chart or geometric pattern that represents  symbolically the universe. 


I thought this plate was perfect for a boho-hippie look!
As you can see the desis are really thin and detailed.I used a white polish as base and different shades of polish mixed together to stamp. i only stamped half nail, on the other half I applied some shattered glass cellophane pieces.

Here is a small video to show how well the plate is engraved and how to create a gradient stamping effect mixing some colours on the plate.

Click play!


mercoledì 31 agosto 2016

New York Nightscape graffiti nail art!

Hi again!


as you know a few days ago i received a nail mail from Born Pretty Store. They sent me some items for a review and I always get inspired by their products.
The company let me choose amog a large range of nail decals and I was struck by the beauty of these nightscape decals.
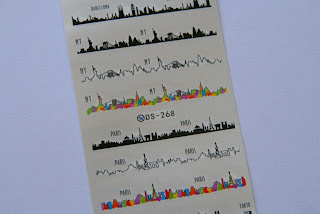
Whithin one sheet you have four city landascapes (Barcelona, Tokyo, New York and Paris) and each has 3 different versions: one in black, one minimalistic with a black line and a colourful one.
They work well on light colours as well as dark ones.


You can use my coupon code at check out to get 10% off RASX31 on www.bornprettystore.com

I tried the coloured skyline of New York over a white polish and the result is stunning, I did a small and easy nail art on the index finger: with a small brush I applied a small amount of acrylic paint, i used the same shades of the decals and I applied the little "NY" written. 


I have cut some stripes horizontally and placed them on the nails.
 Once you have cut the design you have to remove the plastic top.
This step is very important because if you don't remove the plastic film you will have an unusable water decal.
Soak the piece of the pattern in water for few seconds and then remove the decal off the backing.
Place it on the nail, smooth the surface and be careful, you might create some air bubbles. It's a good tip to dab the eccess of water with a tissue (or you can blow dry).
Seal the design with a clear top coat.
You can cut the eccess of the decal with some scissors or remove it carefully with a small brush and some nail polish remover.

I hope you like this nail look!

Have a nice day


Laura

venerdì 19 febbraio 2016

Ehi guys! Check out my elegant feather nail art tutorial for @nailitmag 

http://www.nailitmag.com/nail-art-how-to-elegant-feathers/

Elegant feather nail art


THINGS YOU NEED:


-      Kiko 3 in 1 matte base
-      Pupa Lasting color sheer white
-      Barry M Silk nail paint in Pearl
-      Barry M Royal Glitter collection in Lady ( sparkling glitters nail polish that looks like snow)
-      Barry M Royal Glitter collection in Duchess (sparkling glitters rose/pink undertone with silver glitters)
-       striping thin brush
-       make up sponge


STEP 1:


After using a clear base for all of your nails, start by painting your index and ring finger with the sheer white nail polish. Paint the other three nails with the Barry M silk white. This particular polish has a beautiful silk sheen, the white is pearlescent and almost matte. You can achieve a similar effect with an iridescent white and a matte top coat.


STEP 2:


After the base colour is dry, apply a mix of Barry M glittery nail paint in Lady and Duchess on the corner of a make up sponge. Dab the sponge from the cuticle area to the free edge. Repeat this step until you create a delicate gradient effect.


STEP 3:


Now it’s time for the feather design! With a striping brush and a white nail polish draw a simple curved line from the cuticle to the tip.


STEP 4:


 Start building the shape of the feather with some light strokes on each side of the line. You don’t have to be too precise, fill the gaps to create a feather-like effect.  Repeat the design on the ring finger, you can vary the position of the feather as you like.


STEP 5:

To enchancethe design I used the Barry M glitter nail polish in Duchess and placed it along the shaft of the feather. Don’t forget to seal your design with a top coat.