LaurasPills

LaurasPills
Visualizzazione post con etichetta nail tutorial. Mostra tutti i post

mercoledì 27 marzo 2019

Blooming nail art! Ink/ watercolour effect


Hello!
As you know I have a special love for the water colours/ink effect nailart.
The technique is borrowed from the world of fine art an the result is stunning!
 I’m using the traditional method of ink that you would typically find when painting on paper, it doesn’t require precision.

The brand Born Pretty Store created a line of Blooming nail polishes for this purpose.

You can use my coupon code RASX31 for 10% off on www.bornprettystore.com

I have picked two colours the first one is:
BP-HI02 The Soul of Cloud, it is a light pink. In the bottle it appears as a clear orange, but it it will turn pink once you apply it on the nail.


The other colour I picked is the blue:
BP-HI01 The Glory of Star
A light blue that as the previous one appears a lot darker in the bottle.
link:
https://www.bornprettystore.com/born-pretty-bloom-nail-polish-whiter-purple-nail-varnish-manicure-design-p-44181.html


The clear polish for smudging is from Nicole Diary, a brand that Born Pretty Store sells on its online shop:
ND07
https://www.bornprettystore.com/nicole-diary-watercolor-marble-nail-blooming-nail-polish-nail-varnish-manicure-design-p-45546.html


These  nailpolish  formula is a lot different from normal ones, it more liquind and thinner and it has a different smell.

Here is a short video tutorial to show you how I used them


Prep the nail and apply two coats of white polish followed (Here I used a glossy top coat but It work better with a matte top coat because it create a better surface to apply colours). You have to careful and apply the white colour evenly with no any brush stokes visible. There should not be any lines on the surface.

When the white polish is completely dry you can start adding few drops of both colours.
Then I applied the transparent blooming polish from Nicole Diary to smudge and create the unique effect.

Let the colours blends and let it dry for a few seconds.

Add other coloured drops if you need to. DO NOT overwork the colors with your brush. Let it dry.

 Apply top coat to seal in the design. As you can see from the video with the top coat the colours will turn a bit lighter and saturated, Keep this in mind when you create  the design.


venerdì 23 febbraio 2018

Gold and black nail art!


Hello!
I recently received a brand new nail mail full of wonderful products from Born Pretty Store.
When I opened the package I was very surprised by how shine and gold they looked.
I wondered for a while what colour to use with them but then I decided to go for a simple black and an accent matte gold nail.

 The sheet contains also others patterns: two geometric intricated designs and a vertical chain like stickers.


I feel in love with this geometric mosaic pattern in gold and white. The sheet is approx 11.6 cm x 9 cm. It is enoght for several full manicures.
You can buy it here.
There are others six patterns available all geometric and in gold and white!
If you decide to give these stickers a try please don't forget to use my coupon code, it will give you another 10% off:    RASX31 on www.bornprettystore.com


These stickers are very easy to use. I prefer applying them on a dried base colour.
You have to be very careful when you apply the sticker because it might leave some air bubble.
To make sure the nail art will last long you have to apply a top coat. In this case I applied a matte top coat. I think the matte gives this nail art a modern touch!


Then I tried to change a bit this nailart by adding a marble effect on some nails. I used black, white and gold acrylic paint on a white base, I mixed the shades randomly with a thin brush.

I hope you like the result!


Laura


giovedì 1 settembre 2016

Vintage rose nail art

Ciao!


This is the last nail art with the amazing products Born Pretty Store sent me.
They have a wide range of water decals but I completely feel in love with this pattern; it shows some delicate roses in two shades, a peach pink and an ivory white, on the background you can see some green leaves. The print is very detailed and it will look wonderful on long nails as well as short ones. 


You can use my coupon code at check out to get 10% off RASX31 on www.bornprettystore.com


This pattern will give a delicate and elegant touch to your style, perfect for weddings too, you could paint all of your nails with a peach pink shade and add the decals only on the accent ring finger.

The waterdecals are protected by a trasparent sheet. You can select the size and the design you want, cut it with a scissor. Don't forget to remove the plastic sheet.
Now you can plunge it into water and wait for 10-20 seconds.
The design will separate from the paper, and it's ready to use.
The instructions suggest to place it on  the nail and blow dry. (I skipped the last part because it's very hot today and the design dried fast). The last step is to secure it with clear nail polish.

Even if your nails are quite long you get enough product to cover all of your ten nails. 

I decided to do something more creative with it!

I used a light nail polish as base on the thumb, index and ring finger. 

Then I applied the water decals on on the entire nail.


On the middel finger and pink I applied a dark green colour and I added a stamping nails art in gold, a rose pattern that matches the water decal. The stamping plate is from MoYou London, Flower power collection plate 04.


I wanted to add a sparkling touch to the entire look so I painted a line on the side of the thumb and middle finger in gold, then I used a iridescent green paper to create a broken glass effect. ( I used a gift paper wrap).


This is the result. I hope you like it.

Thanks for reading 

Laura


venerdì 26 agosto 2016

Cocktail nail art


Hi there?
How is your summer going? Mine has been hot and lazy. 
I didn't feel like doing something too difficult and elaborated on my nails so I thounght it was the perfect occasion to try this sheet of water decals nail stickers.


Few days ago I have received a package from Born Pretty Store, I had a few collaborations with them in the past and I love their nail products because they are affordable and they offer a wide range of design and colours. They sent me these items for reviews and I really like them and I would purchase them myself.

You can use my coupon code at check out to get 10% 

off RASX31 on www.bornprettystore.com


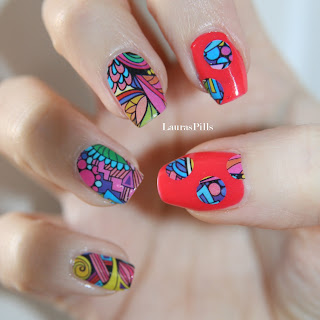
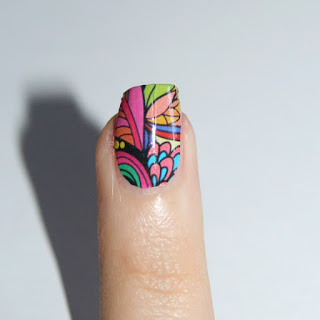
I chose the pattern number 2542, it is a tribal floral design very colourful and bright (there are some others beautiful pattern available).
I find this kind of supplies very useful when you are in a rush or you run out of ideas. As you can see from pictures you have enough decals for covering all your ten nails.

 This kind of decals are meant to cover the entire nail so it's always better to use a base, a neutral colour or as in this case, a colour that can make the decal stand out.
In my opinion the best choice for this one is a white nail polish.

Then you can cut the decals in a shape that match your nails and remove the plastic top.

This step is very important because if you don't remove the plastic film you will have an unusable water decal.

Soak the piece of the pattern in water for few seconds and then remove the decal off the backing.

Place it on the nail, smooth the surface and be careful, you might create some air bubbles. It's a good tip to dab the eccess of water with a tissue (or you can blow dry).


Seal the design with a clear top coat.


You can cut the eccess of the decal with some scissors or remove it carefully with a small brush and some nail polish remover.


As you can see, not all my nails are covered with the pattern. I decided to cut some small circles with a hole puncher (the common one you use for documents) and I applied them over a layer of a coral red polish.


This colourful and bubbling effect reminded me of a cocktail so I decided to make a cool one and pose for some pictures.
Let me know if you like it or not!


Best wishes 


Laura