LaurasPills

LaurasPills
Visualizzazione post con etichetta pr sample. Mostra tutti i post

sabato 19 dicembre 2020

Floral nails for Christmas


A simple and easy idea for festive nails!

These are water decals! So cool and fast to use! You can find them at www.bornprettystore.com


You can find these at @bornprettystore @bornprettyofficial Haronuta X053 id products #50127

and at this link

https://www.bornprettystore.com/harunouta-sheet-water-decals-fruit-flower-summer-alphabet-leaves-nail-stickers-p-50127.html

You can use my coupon code RASX31 for a discount


I was really surprised by designs and the unsual colour palette. The decals show some flowers patters and leaves, there are roses and red and pink flowers and some cute birds too.

The patterns are really elegant and perfectly painted.

The design print is perfect, printed in hight resolution, lines are very sharp and colour are vivid. I am a huge fan of water decals in general! They are super easy to use and you can spice up your nails instantly with intricate looking designs. They are also a great alternative to stamping when you want a professional look in a few minutes.

There are many other patterns you can pick and use.

The application is very easy.

The waterdecals are protected by a transparent sheet. You can select the size and the design you want, cut it with a scissor. Don't forget to remove the plastic sheet. Cut out the section of decals, and let it soak in room temperature water for about 15-30 seconds, slide the decals off the paper backing with tweezers and place on the nails with the white or nude base coat

The instructions suggest to place it on  the nail and dry with a tissue. The last step is to secure it with clear nail polish. In my case with a matte top coat.


lunedì 14 dicembre 2020

Aurora powder in yellow from Born Pretty Store


Hello,

today I would like to show you another product from Born Pretty Store.

It is an iridescent powder I have already tried before, but I was curious to try it in another colour, this bright yellow is perfect for Holydays.

You can use my coupon code

RASX31 for 10% off on www.bornprettystore.com

The powder I used in this nailart is in the colour CH-04

Id product #47413

I have decided to try it over a french manicure so that the effect would be more visible.

It very easy to use.

After the french manicure with gel polishes I used a no wipe transparent top coat and cured it under a uv lamp.

Then I used a make up sponge to apply the powder, it created an iridescent glossy effect. Brush off excess powder.

The last step is to secure the nailart with another layes of no wipe top coat.

I was right to try this colour too, the yellow over pink looks amazing! 


You can use my coupon code
RASX31 for 10% off on www.bornprettystore.com


mercoledì 7 agosto 2019

How to care for problematic nails


Hello!
This post will be a bit different but I think it is important to talk about whats underneath our canvas, our natural nails and their frame, cuticles!

I used to have strong, long and beautiful nails, they were growing fast and they do not need a lot of taking care of. then I started having health issues and the fairytale with my nails ended soon, with low iron levels and anticoagulants I said farewell to my strong and long nails.

My nails became so brittle and weak that I had to use full cover false nails for nailart (yep this is my darkest secret).

That said, I still wanted my natural to look good and long so I that I could paint them and be nice in my daily life.

So I have learned in these last years how to take care of problematic nails, here are some tips that I would like to share with you:

1. Keep them painted

The number one mistake I did when trying to fix my nails was to keep them natural and away from polishes. At the time I did not realized that polish was a big help for my brittle nails, it provides extra layers serving as protection to your nails.
I always switch base coat, I alternate whitening base coat and stenghten base coat (this last one can make the nails stronger but also dryer, so I suggest to do not use it everytime).


2. File them .... in one direction

Do not file them back and forth but in one direction. Going back and forth will heat your nails and create minor cracks.
Also a rounder shape will prevent breaking at the edges.

3 Don't cut your cuticle and keep them moisturazed

Our cuticles are a very important barrier that stops bacteria, germs and fungus. I have never cutted them.
Cuticles can be pushed back with an orange stick after you use a moistirizing oil to soften them.
The oil should be used not only for manicure routine but everyday best before bed time and more than one time at day.

In these last days I used the new cuticle pen from Born Pretty Store, they sent me this and few other products to try and review for you. Id code # 42380


As you can see it has the shape of a pen that you can easily carry in your purse or leave it on your desk while working on the pc.


It has an easy to use applicator that features a brush top with a twist up applicator to add more oil to the brush. You have to turn the base of the pen to force the oil into the brush tip. I like that - keeps the oil from running out all over the place.  It's very easy to use and there's no mess. I like that I can control the amount of oil that is dispensed through the applicator


 You can get a 10% discount at @bornprettyofficial using my code: RASX31


The ingredients are all natural: it has natural oils such as Safflower oil, olive oil, grape seed oil to moisture formulated for cracked and rigid cuticles and nails.
It also has Keratin and vitamin E to strengthen the nails.
It has also a very nice smell,

I have been using it for a week and as you can see from the picture this oil helps to restore a healthy nailsurface and the formula moisturaze the cuticle and penetrate easily.

If you want to use it as a cuticle softener. These are the instructions:
1.Apply cuticle softener and wait for 1-2 mins
2.Push the dead skin softly with cuticle pusher
3.Remove the dead skin with cuticle clipper
4.Apply cuticle oil

I hope this post was helpful! Have you tried these tips before? What works for your nails?
I would love to know!


giovedì 26 luglio 2018

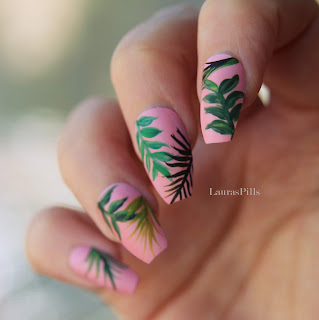
Tropical nails! free hand with striping brush


Hello!
I recently received a nail mail from Born Pretty Store, I have been in an affiliation progam with this company for many years. I really trust their product and they always have nthe newest trend in the nail art field and I have never been disappointed.

This time I decided to experiment with some free hand designs. I picked some new brushes and tool.

I tried two striping brushes and i have decided to use one with acrylic paint and one with nail polish to see if there were some differences.

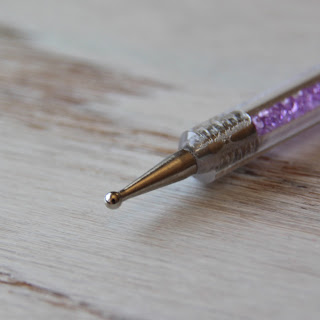
The first one I would like to show you is this Dual-ended Liner Drawing Brush . Id product # 42603
Nail artists know that you can never have enough nail art tool so when I find 2 products in one I am super happy. In this tool you will have one end with a dotting tool and the other end with a striping brush.


The company was kind enough to offer a 10% discount to my readers. Just use promo code RASX31  during checkout. Shipping is free on all orders as well!


The handle is very fancy, it is transparent and filled with sheer purple rhinestones. It is very beautiful and it stands out in my collection.


The brush is 14,6 cm in total, th string brush is 1,5 cm long,
The brush hair is very flexible and thin but quite resistant.  
If you use it for the first time it is a good idea to clean it with water and wipe them on a towel to get that stickiness out of the bristles and make sure all the hairs stick together for an optimal result.
This brush is very useful to draw  very thin lines, I thin they are perfect for abstract painting or organic design such as leaves, flowes, marble etc.


So I wanted to try a tropical nail art. As base I used a light pink. I started drawing a line for the branch with the striping brush and then a used a bigger brush for the leaves.
Then I draw the palm leaves only with the striping brush I mixed different colours from black, to green, dark green, light yellow.
When you use striping brushes with acrylic paint you can easly clean them with water.


giovedì 7 giugno 2018

Coloured sequins nailart and video tutorial


Hello!
I am so excited to show you this product today!!!
Born Pretty Store was nice enough to ask me to do a review of some products for their website and since I have been dying to try these iridescent sequins on my nails I opted to review these. I have been shopping on Born Pretty pretty much since I started this blog. They have everything you can wish for in the nail art world and their prices are hard to beat -there is also free shipping.


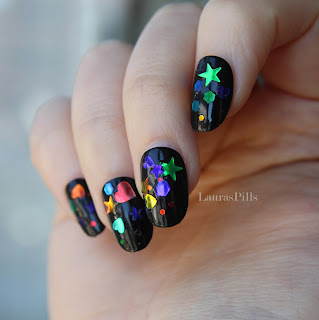
You will get 6 boxes for the price of 3.59 usd. Each box contains 2 gr of product this means a lot of them. I am totally in love with this products. I love the shapes and the fact that they come in different colours and sizes. The sequins are quite sheer with an iridescent sheen and tone that makes them appear different over different colours.  I think that the shades included can cover all the color spectrum.

Here there are some picture that show you how they look in the pot and over a black base:


Mixed shapes


Stars


 Hearts


Exagons


Flowers


Round shape


The company was kind enough to offer a 10% discount to my readers. Just use promo code RASX31  during checkout. Shipping is free on all orders as well!

Here is a short video to show you the application:


It is very easy to apply them:
 You can apply them over a layer of wet nail polish, in this case a chose a black shade and set them in place with another layer or two of clear top coat.
The application was very easy because I used this great new tool: a white wax pencil expecially designed to pick up gems, rhinestones, sequins.
The larger sequins are a bit harder to use because they don’t bend to the curvature of your nails, you can try to shape them before or  add more layers of clear top coat just to be sure.

mercoledì 27 dicembre 2017

Christmas tree nails!


Christmas is not my favourite time of the year #teamgrinch .
This year I have been minimal with decorations too.
 I found these geometric trees @flyingtigeritalia , I really like them so I thought it would be a good idea to pair them up with a nail art!


I recently got a nail mail with wonderful items form Born Pretty Store.
These triangle studs were exactly what I needed:
http://www.bornprettystore.com/boxes-chameleon-color-nail-sequins-colorful-triangle-rhombus-flakies-glitter-nail-paillette-p-41283.html

For 2.99 usd you will get 6 boxes, you can choose between two shapes: triangle and rhombus. I got the triagle of course! I received 6 different colours: green, silver/white, holographic, purple, gold rose, green/yellow. All these colours are chromatic so they have a colour shift effect that makes them very unique and festive!

Here are all colours on a thumb nail


For this nail art I used the first three colours.


As you can see from the pictures, these studs are not completely flat, but they have a nice 3d effect that gives dimentions and different light reflections.


As base I used some black glittery nail polish and on the ring finger a white snow glittery polish. On Index and ring finger I did some abstract geometry. On the middle finger I tried to recreate a tree shape with the green studs. On the ring finger there is a slightly sheer effect, I added some pearlescent white nails at the base and the tip.
The studs are really easy to apply, I used a dotting too on a wet polish, then seal it with a clear top coat.

I will use these sequins in other nail art for sure, I think they are a great deal because you get 6 boxes in different colours for a very low price.