LaurasPills

LaurasPills
Visualizzazione post con etichetta born pretty review. Mostra tutti i post

mercoledì 16 gennaio 2019

The best black stamping polish!


Hello!
Let's go on with our stamping polishes quest!
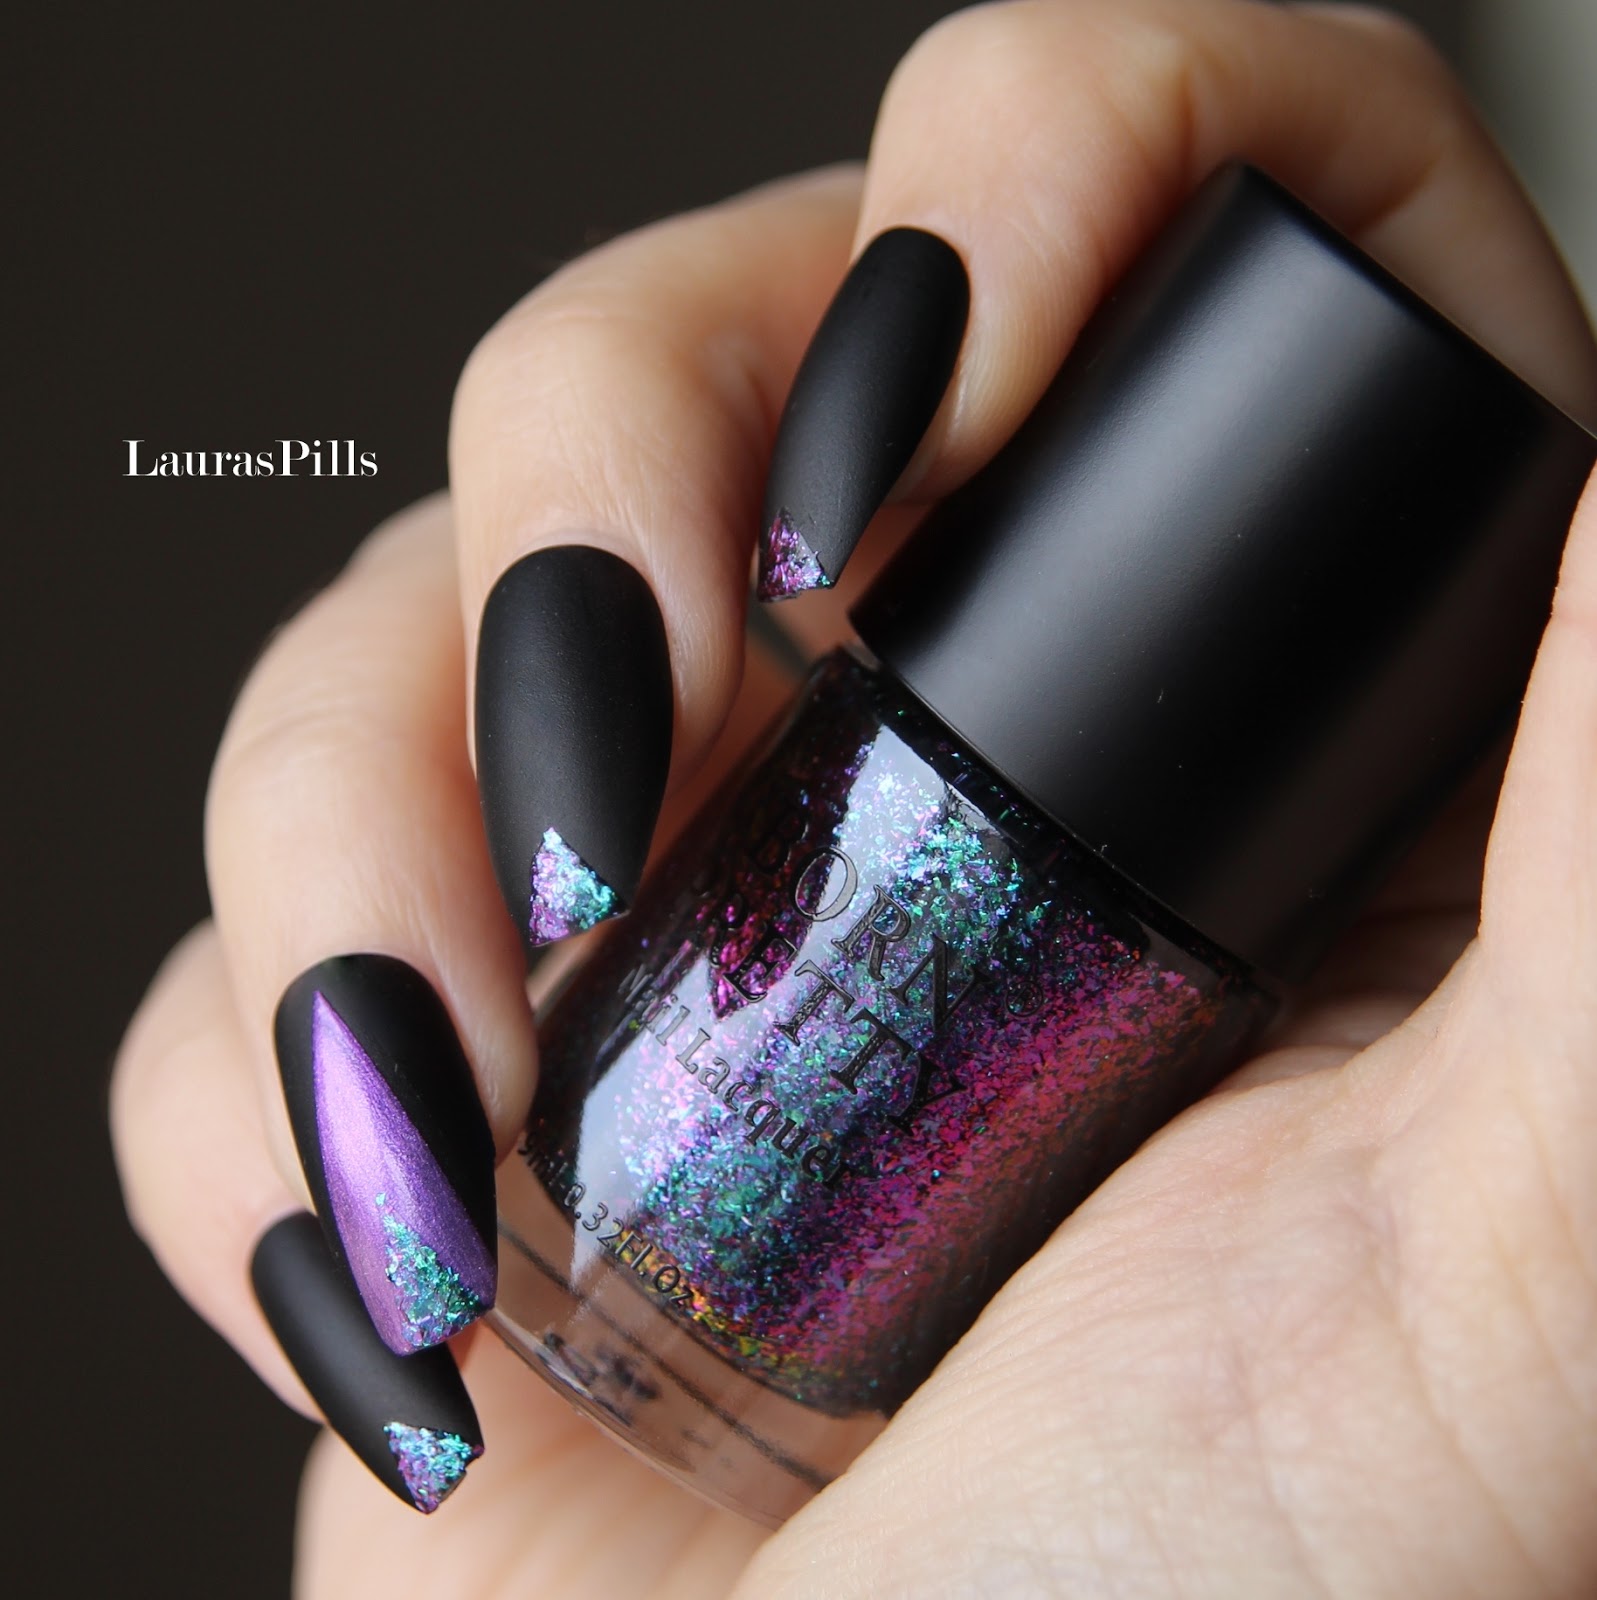
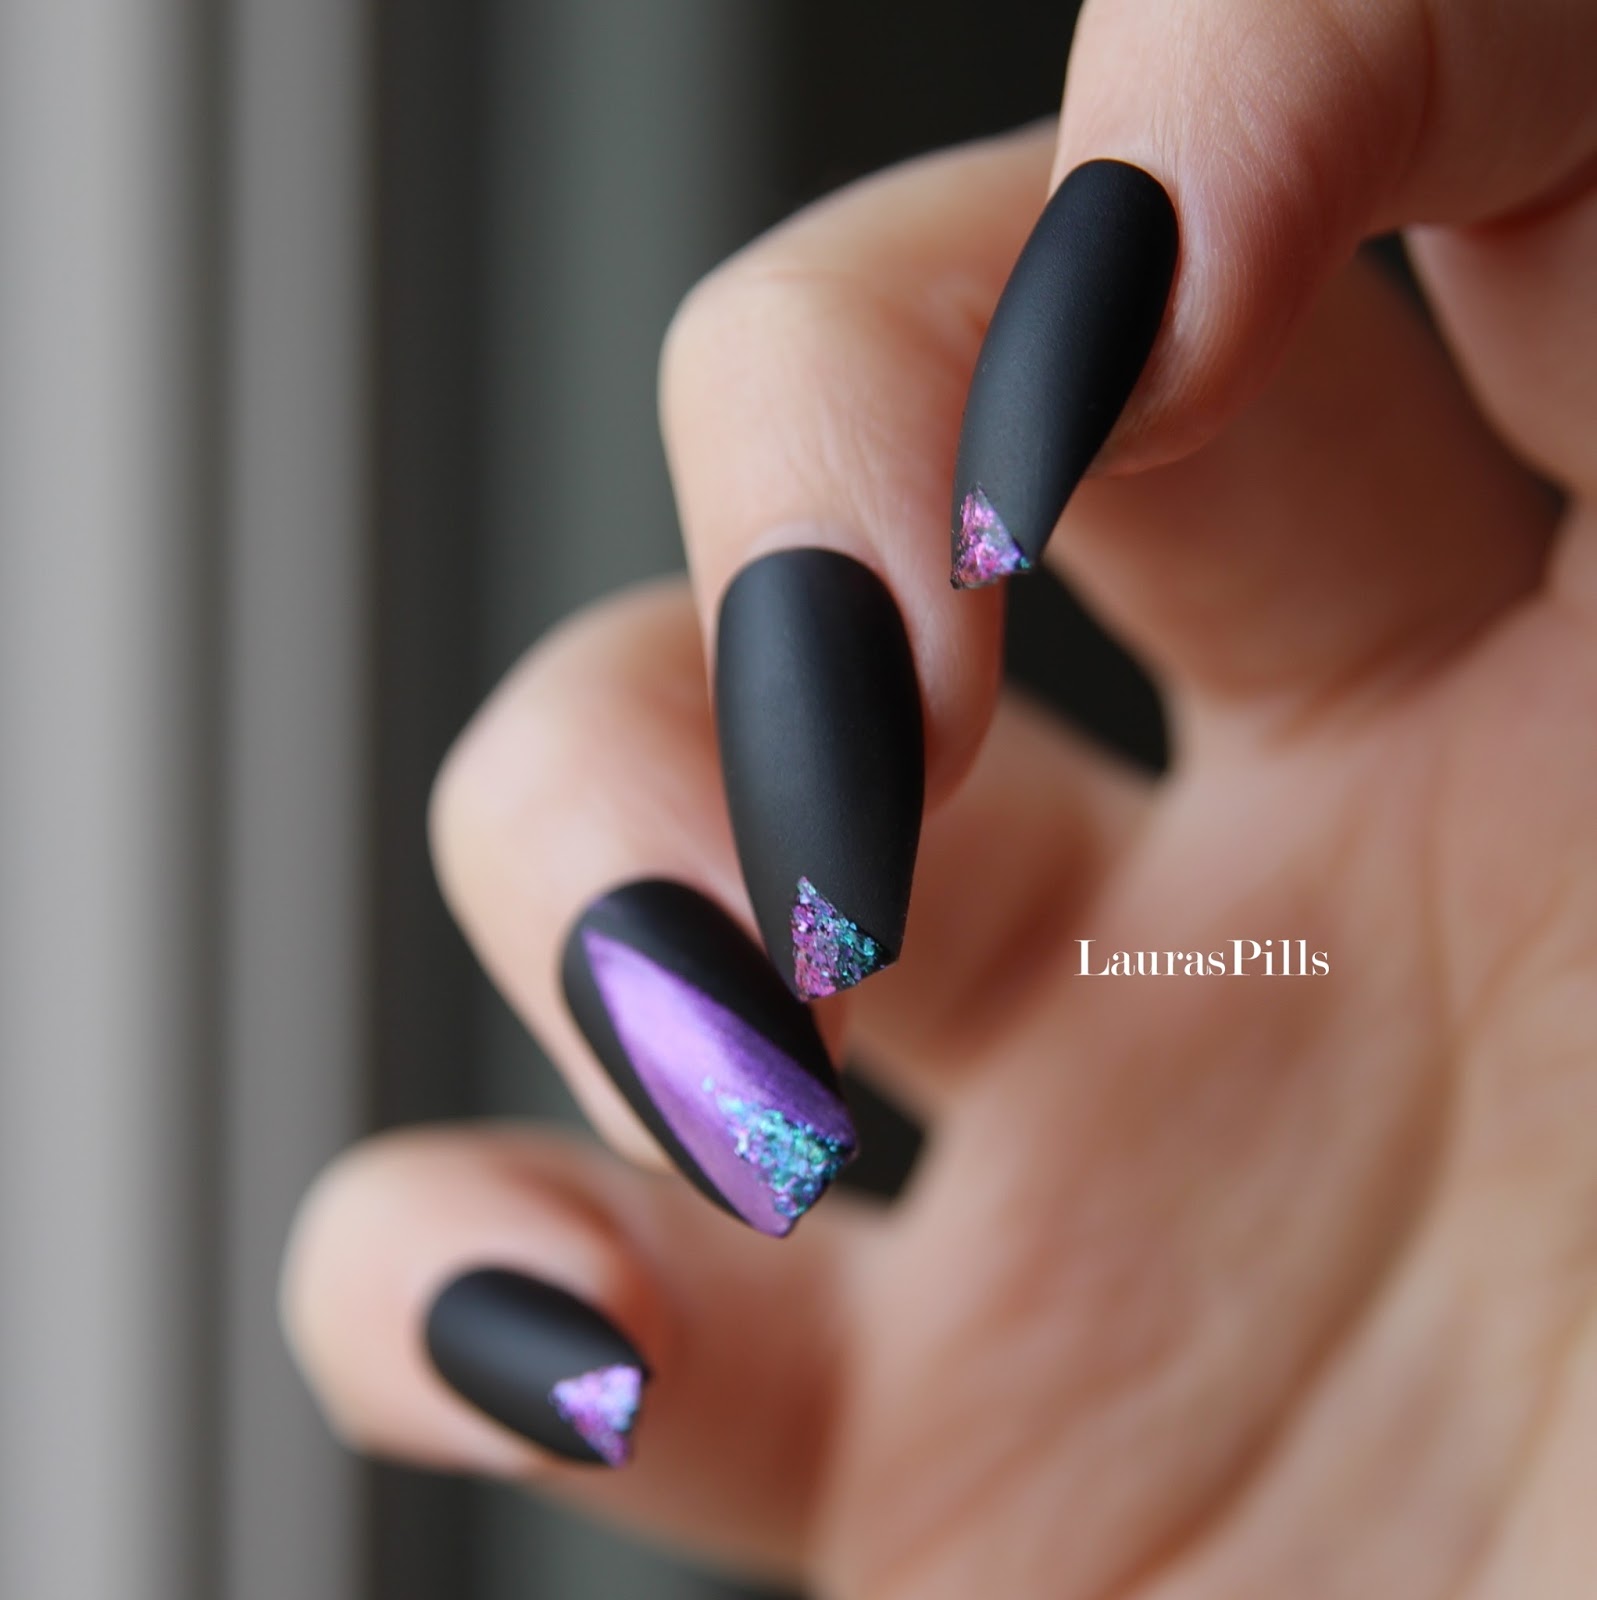
Now it is the time to show you a passepartout: a black stamping polish!

One of the biggest tips out there for successfully mastering the art of stamping is to invest in top quality nail stamping polish.
The general rule is if the polish is thick and can be applied with almost full-coverage in one coat, it’ll probably work well as a nail stamping polish.
Having a good black stamping polish can unlock you the doors of the heaven of nail stamping. It is a colour that you can use almost over any colour and it perfect for advanced stamping technique because it creates the perfect outlines for any coloured design.
For this reason the stamping polish you choose has to be perfect.


As you can see from this picture this nail polish is excellent, long-lasting, chip-resistant with supersaturated colour pigments. 
It is from Born Pretty Store called Throne BP-WN03 # 42857 . It has an excellent consistency. You will get one cute bottle that has the capacity of approx. 6ml.


This is the third colour I try from this collection from Born Pretty Store and I think they are the best stamping polishes I tired so far, The lines are perfect.

For this shade I wanted a modern and geometric design. I used this plate number BPL-027.  The plate has tons of beautiful designs that are perfect for lead lighting, laying over gradients, reverse stamping and more! I highly suggest this plate.


lunedì 26 febbraio 2018

Hidden nail art with thermal polish


Ever since I was a child I have been very fascinating with colour changing items.
 In the middle of the 90s there were a lot of merchandising such as lipstick, mood rings, pens and stationery that was supposed to change colour according to your mood. To be honest that had nothing to do with mood or feeling but there were just pigments that changed colour depending on the temperature of the environment or the body.

Thermal polishes have been around for a while but I find very hard to buy them from local stores because they are part of temporary collections or you can't try them and see the real colour shift.
Online you can find a larger selection, in particular the online store Born Pretty Store has many colours, normal polishes, gel polishes, glitter polishes, they even offer colour changing pigments.


Last time I have tried a beautiful coral pink, now I decided to go for a darker shade a deep grey that turns into a icy light grey or even white.
I think this beautiful grey will lent itself well with a geometrinc stamping nail art!
What I love to do with these kind of polish is what I call an "hidden nail art".

Here is a small video to show the amazing colour changing effect!


I paint all the nails with the thermal polish and then I stamp over it with a very similar colour.
It is hidden because when your hands are cold it looks like a normal plain grey nail polish but when your nails are warm the nail polish turns light grey (white) and it reveals the geometric design.


You can buy it here and there are other 9 shades.

You can use my coupon code at check out to get 10% off RASX31 on www.bornprettystore.com

The bottle contains 9 ml. The formula is a bit thicker than a normal polish, I think because it contains this special thermo sensitive pigment. Two coats are enough to create an even colour and I had no issue with the application at all.

I stamped with this beautiful plate for BPS too:
you can find it here


I added a triangle flakie decoration on the ring finger.


giovedì 11 gennaio 2018

Pong geometric nail art!


Hello!
Do you remeber pong? If not.... Gosh you are really young!
 Pong is one of the earliest arcade video games. It is a table tennis sports game featuring simple two-dimensional graphics. The game was originally manufactured by Atari.
This what the it looked like basically:

                                                                   image source


Well that's what this nail art reminds me of, except for the dark burgundy mauve background. of course!

How to achieve this result!?
It is really simple, I used some nail sticker from Born Pretty Store.


It is a full sheet of nail stickers. It measures 12.5cm X 6.7cm. The sheet has 4 different designs: some squares, some diamond like shape, some small circle and the little stripes I used in this nail art.

                                                                            stripes

                                                            small circle shapes

There are 6 colours to choose from,1 holographic. I picked the colour number #4. The effect is very similar to the iridescent paper foil used for laser or shattered glass nail art. Is has different shades on different base colours. I used a matte top coat, I think it gives a nice high tech look to the whole manicure.
 

You can apply the sticker over a dry nail colour base.
You can use your nails or a pair of tweesers to remove the design for the sheet and apply it directly on your nails.


 You can press a bit with your fingers to smooth the sticker surface and get rid of any air bubble.
Finally you can use a top coat for a long lasting result.


You can also apply a larger portion of stickers and peel it off with tweesers.


A great idea is to save the ramaining sticker and use it as decal, filling the gaps with a pigmented nail polish.


martedì 17 ottobre 2017

Holographic Nail Powder Super Shine


Hello!
This week is full of nail art reviews!
I really love holographic powder! It is such versatile invention, you can mix it in your favorite polish, use it in a top coat, dab it and cover the entire nails, you can do french nails and so on.!
I am always excited to try new powder and textures,

Few days ago I tried this new powder from Born Pretty Store. This was part of a pr sample that the company sent me.


You can find this product at this link:
http://www.bornprettystore.com/born-pretty-holographic-nail-powder-super-shine-sequins-manicure-nail-pigment-glitters-p-40866.html


I selected the colour b26 (an holographic silver shade) but on the site you have 10 colours, next time I will be very eager to try another colour such as red or green, perfect shades for Christmas.

It comes in a nice plastic container and a sponge applicator. The powder is quite flakie-like and the are dust is made up by fine glitters and bigger glitter.

I was curious to know how it looked like on nails so I decided to use it over a white base. As top coat I used a holo glitter top coat for two reasons: it will fill the gaps and it will enhance the holo refraction.
 I love the fact that is has a raw finish, similar to  sand, stucco, or rock like finish. This makes the look very unique! Another big pro of this kind of nail style is that glitters are very long lasting! You will have hard time to take them off!


Here is a small video to show the holo effect. I find it very difficult to capture with a camera the holographic effect, but believe me it is stunning in real life.


lunedì 16 ottobre 2017

Glitter triangle tip nail art!


Hello!
In this nail art I combined two nail polishes I reviewed few posts ago!
I really enjoyed playing with them and I think that these two shades work very well together.
This look is really easy to achieve and you don't have to do it on all your nails, you can do just an accent nail if you like.


As base I used a black matte nail polish. I suggest you to let it dry completely, this is very important because the next step will be to use some tape on your nails.

The tape is perfect to create a precise triangle you can use normal tape or nail art tape. You can cut two pieces of the tape to create the shape of triangle,or any shape you want.


For thumbs and ring finger I create two triangles one inside the other, the first one with the Born Pretty Store Shell shimmer in the colour Only You , it goes from the tip of the nail untill the cuticle, and another smaller one with the Chamelion Flakie polish in the shade M12 Destiny Fairy.
On the remaining nail I made a smaller triangle and painted it with Destiny Fairy.


I think the contrast between the matt dark colour the shimmer pearlescent of Only you and the flakie polish.