LaurasPills

LaurasPills

martedì 8 settembre 2015

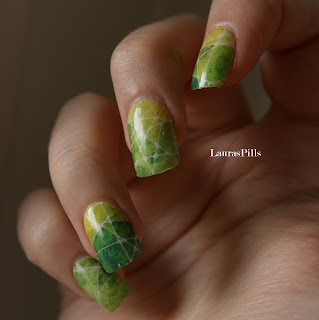
Bright nail art with water decals!


Hello everyone!
Summer is almost ended! Even thought it's raining right now I still feel in the mood for colourful nail art!
So today I have some Born Pretty Store decals to review for you.
This product was kindly sent by the company.

You can use my coupon code at check out to get 10% off RASX31 on www.bornprettystore.com

Even if I love doing my nail art with stamping tools or free hand I am always looking for new ways to make cool designs easly and quickly. With these nail decals you can achieve a big effect with a small effort.

This sheet of water decals is very particular and graphic, the shades are lovely and bright they shift from yellow, green, orange to a nice red.


You can find it at this link
 http://www.bornprettystore.com/sheet-irregular-pattern-water-decals-gradient-color-nail-transfers-stickers-p-21457.html

How to use:

This kind of decals are meant to cover the entire nail so it's always better to use a base, a neutral colour or as in this case, a colour that can make the decal stand out.
In my opinion the best choice for this one is a white nail polish.

Then you can cut the decals in a shape that match your nails and remove the plastic top.
This step is very important because if you don't remove the plastic film you will have an unusable water decal.

Soak the piece of the pattern in water for few seconds and then remove the decal off the backing.

Place it on the nail, smooth the surface and be careful, you might create some air bubbles. It's a good tip to dab the eccess of water with a tissue (or you can blow dry).

Seal the design with a clear top coat.
You can cut the eccess of the decal with some scissors or remove it carefully with a small brush and some nail polish remover.

I hope you'll love the result!


That's all for now!
Bye

Laura

sabato 5 settembre 2015

Silver and blue star nail art!


Hi readers!
Few days ago I received some items from Born Pretty Store.
I've never used vinyls stickers so I was quite curious to try and see how they will work..
If you are a newbie in nail art this kind of products are the best because the design is already made and you don't have to be too precise.


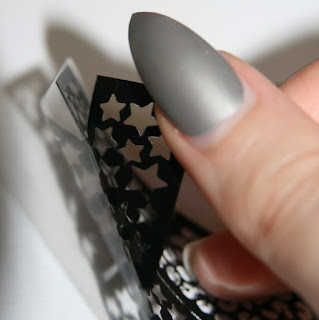
They sent me the stencil number NK 03 which contains 12 stencil: 6 with some stars and other six with a leopard print (you can find many other patterns in their site).

You can use my coupon code at check out to get 10% off RASX31 on www.bornprettystore.com


For this nail art I decided to go for the star pattern.


How to use:
First of all you have to apply a base colour.
You can cut the section of the stencil you want to use, remove the transparent paper and stick it on the nail. (Please remember the nails polish have to be completely dried). The stencil is sticky, it will stay on perfectly.


At this stage you can apply a layer of nail polish. But I did something different. I used a make up sponge to dab some colours on the stencil. In this way you can apply the right amount of nail polish and prevent it from smudging moreover you can create an easy ombrée effect with different shades (as I did on one finger mixing pink, blue and purple).


Remove carfully the sticker and finish with a layer of top coat.

For the last touch I used some 3D decoration: these five pointed gold stars I painted in blue to match the nail art.


These kind of decorations are very versatile, they are perfect on the top or the bottom of the nail, there are other 4 colours available: gold, glittery white, white anf black. You can use them to decorate any kind of object and you can glue them on nails with some clear nail polish.


Thanks for reading,


Laura

lunedì 6 luglio 2015

Pink stiletto nails with crystals!

Hi guys!
Last moth I ordered some crystals from Born Pretty Store.
I saw crystal nails everywhere lately so I wanted to try some too.


I bought this weel of  colourful rhinestones (click on the name to open the link).

You can use my coupon code at check out to get 10% off RASX31 on www.bornprettystore.com

 I really like them because they are not clear they have some iridescent reflects. Rhinestones show every colour of the spectrum pink and purple, green, blue, yellow. They shine  even more under sun light and they show different colours depending on the angle of the light.


In the wheel you can find four different sizes (approx 5mm, 4mm, 3mm, 2mm).
They are very esay to apply, you can use clear nail polish as glue and a dotting tool to place them on the nails. Seal with top coat.
I created a nail art using all four different sizes.


These rhinestones are very versatile, you can use them with your make up, for example you can place the medium sized one in the inner corner of your eye with some lashes' glue. You can use them to decorate your cellphone or glasses.
Thanks for reading!

Laura

*I bought this item with my own money


domenica 5 luglio 2015

Summer dream nail art!

Hi there!
Summer makes me feel like fresh colours, flower pattern, bright shades!
This time nail art on both hands!
I used Born Pretty Store stamping plate n 48! You can see previous post for this plate's review.


Talk to you soon!

Laura

Peacock feather nail art


Hello everybody!
Today I would like to show you a colourful nail art for summer!
I recently received some items from Born Pretty Store. They were so kind to let me chose some items and send me some samples to try.
I choose a peacock pattern water decals and some triangle nail art decorations. (click on name for the link). I think these two items match perfectly for a nail art.

You can use my coupon code at check out to get 10% off RASX31 on www.bornprettystore.com


It was my fist time with water decals but I can say these were pretty easy to use.
The waterdecals are protected by a trasparent sheet. You can select the size and the design you want, cut it with a scissor. Don't forget to remove the plastic sheet.
Now you can plunge it into water and wait for 10-20 seconds.
The design will separate from the paper, and it's ready to use.
The instructions suggest to place it on  the nail and blow dry. (I skipped the last part because it's very hot today and the design dried fast). The last step is to secure it with clear nail polish.


You can cover the whole nail but i decided to do something more creative.
I used a white nail polish as base and I applied the decals vertically or across the nail leaving some space and adding a gold sand effect nail polish (from Essence).
The design is beautiful, there are some peacock feather, a colorful and iridescent plumage, and the main colour are light blue and yellow. The design it's perfect and you can't achieve this detailed drawing with stamping or free hand.


On two nails I used white, yellow and light blue and I added some decorations.
These decoration are very particular, they are triangular and have a delicate texure. I like it in golden but you can find them in silver too. You can apply them with a dotting tool and some clear nail polish used as glue. They are quite small so they stay well on nails.


Let me know what you think!
Thanks for reading!

Laura


venerdì 3 luglio 2015

Pink flower nail art with Born Pretty Store stickers


Hello!
Today I've received some products from Born Pretty Store.
The first product that I would like to show you is this sheet of pink flowers stickers.

You can use my coupon code at check out to get 10% off RASX31 on www.bornprettystore.com

You can find it at this link, I chose #1 decoration
http://www.bornprettystore.com/sheet-pink-flower-nail-stickers-chic-floral-nail-tips-stamping-decals-p-20480.htmlhttp://www.bornprettystore.com/sheet-pink-flower-nail-stickers-chic-floral-nail-tips-stamping-decals-p-20480.html


The sheet will arrive in a plastic bag that prevents it from any damage.
The stickers are all individuals and very easy to use.
Make sure your nail is clean or your nail polish is completely dry. Select a design and peel it off the transparent sheet. Than place the desing on your nail, rub it gently so that you can prevent air bubbles. Apply a layer of top coat for the best result.


The stickers are in different sizes so that can fit fingernail, toe nail or nail tips.
The design it's really delicate, a silver outline and some light pink flowers and blossoms.
You can use it with light colours, it goes well with white, pink and light blue but I think it stands better on darker ones.


That's why I created this simple nail art.
The base is a simple black nail polish, then I created a "distressed effect" with two metal colours a purple from Ceramic Effect Layla n CE71 and essence 29 paradise.
Then I applied Born Pretty Store's stickers,
To give and edgy effect I left half of the ring finger nail clear.
This is the final result.
I hope you'll like it!


Thank for reading!


sabato 25 aprile 2015

Gold clovers for spring!


Hi there!
Sping is in the air and I felt in the mood for a bold and elegant nail art.
As base I've used Essence 01 Mauve like a rockstar from the limited edition Rebels. This is a pink/taupe colour with a mixture of brown and purple. This nail polish has a latex finish, it's a semi matte (not too matte not too shiny). This shade has also a bit of shimmer that prevent it from looking complete flat and dull.
I've found this look very interesting and for this reason I didn't use any top coat to cover this effect.
I decided to stamp with Barry M Gold. 

I used Born Pretty Store plate for stamping BP plate 50


I chose the  the clovers design, it's very intricate and delicate perfect for a spring nail art. In fact, under the sun light the effect of the gold polish combined with the latex finish stands out a lot.
It's very easy to stamp with Born Pretty Store plates, all images are well engraved and don't require cleaning after each transfer.
I highly reccomend this BPS plate. You can find it at this link.

http://www.bornprettystore.com/heart-shape-leave-texture-nail-stamping-template-image-plate-born-pretty-bp50-p-18793.html

Don't forget to use my discount code for 10% off your order: RASX31


  Thanks for reading!

Laura