LaurasPills

LaurasPills

martedì 20 giugno 2017

Pop art nail art!


This the coloured version of a nail art that I have done using a beautiful Born Pretty Store comics plate.


Click here to read the post and the review for this plate!

http://lauraspills.blogspot.it/2017/05/comics-pop-art-nail-art.html

If you want to achieve a supre colourful and pop art looking nail art you can a reverse stamping technique and add some eccentric and saturated colours.
This nail art was clearly inspired by Pop Art an art movement that emerged in the mid 1950s in Britain and the late 1950s in the USA. The movement wanted to challenge the tradition of fine art by promoting images from mass culture including advertising and comics books.

The artist Roy Lichtenstein selected old-fashioned comic-strip and he reproduced them in a larger scale.
I took inspiration from his paintings that feature heavy black outlines and primary colours.


I made a small stop motion video to show you how versatile this plate is:


I hope you liked it!

with love

Laura


Buttons for nail polish!

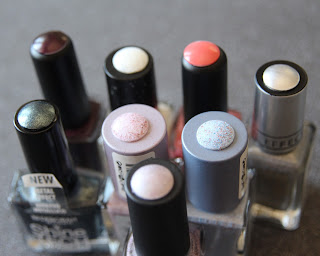
These are some silicone buttons that can be used on nail polish bottle's caps. The main purpose is to be able to find the color that you need quickly.
These are meant to be used with gel polishes which normally don't have sheer bottles.
I used them with regular polishes because I have a big collection that I store in drawers or boxes and I find useful to check all colours in a single glance.


This is the link where you can buy them, 1.99 for 25 pcs is a very good deal.

http://www.bornprettystore.com/10pcs-born-pretty-colour-buttons-polish-color-display-white-silicone-adhesive-paster-p-39376.html

These buttons are very easy to use, you paint each one with the polish you like and then apply them directly on the top of the cap, you don't need glue, each button is self adhesive.
Remember to paint the edges of the silicone button, in this way you will prevent the color to peel or crack.  Be very gently when you apply it.
Here is a small video where I show how I applied it.


Look  how  the section with the buttons looks tidy and nice!


lunedì 19 giugno 2017

All over holo!

Let's be honest some days in a life are shitty as hell and in those days you need an extra sparkle.
Something able to capture every ray of light and trasform it in a beautiful rainbow!
What am I talking about? Love? Wine? Xanax?
Nahhhh! Holo powder!


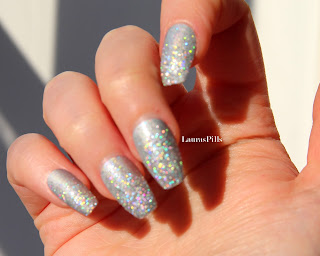
The Holo powder that I used for these nails is from www.bornprettystore.com
You can find it at this link
http://www.bornprettystore.com/holographic-glitter-powder-holo-glitter-dust-powder-manicure-nail-decoration-p-36930.html

 for only 1.99 in different glitter sizes, the one I have is the finest one. It would be wonderful to try the bigger glitter too, maybe next time!


The holo dust comes in a transparent plastic container with the capacity of 3 gr.
It is very hard to capture with a camera the shifting magic of these kind of products! I don't know why but holo is very hard to get with full focus images so you need to take pictures or videos with the main subject out of focus.
You can believe me, under the sun light this powder is amazing.
I used a torch to show you the rainbow shifting in this video:


I used the powder over a holographic nail polish, I applied it only on the tip of the nails with a make up sponge.
Here is a small video tutorial:


Is your life still messed up? Yes?! But your nails are fabulous!

martedì 13 giugno 2017

Galaxy in a bottle!


Hello there!
Today I would like to review this Chameloeon Starry nail polish from the site www.bornprettystore.com.

This is the kind of polish that I call "Galaxy in one bottle" because in one coat you have that wonderful galaxy/space look!


You can buy it for 5.99 at this link:
http://www.bornprettystore.com/10ml-born-pretty-chameleon-starry-nail-varnish-polish-friendly-bpc002-black-base-color-needed-p-37718.html

You can use my coupon code at check out to get 10% off RASX31 on www.bornprettystore.com


The listing on the site says that it is an "eco friendly" nail polish. In fact it does not smell as a normal nail polish. I don't have a list of ingredients to show you but I guess it is a water base nail polish similar to the Little Ondine ones.


This means that it will be super shiny and glossy but also that it will need a polish base and a top coat to make it last longer.


I think this nail polish has the best result over black. It has a sheer duo chrome tint, The colour shift depends on the light that the surface catches from different angles and sources. It has a bit of purple, blue and green. Moreover there are a lots of  holographic glitters. If you watch this polish over the sunlight you won't believe it's real.

Here is a small video to show how to apply it. It was really hard to catch on camera the shifting effect but believe me :in real life it is even more sprakling and shiny!


I hope you like it!
 Love,

Laura


giovedì 1 giugno 2017

Rainbow roses nails!


A rainbow rose is a beautiful rose that has had his petals artificially coloured. 
These roses are super cute, I love things colorful  so I thought it was a good idea to make a nail art wih rainbow roses.


 The stamping plate BLP-67 inspired me immediately because it has a big design with three roses and leaves and one single rose for smaller nails.


You can find this plate at this link: 

For this nail art I did a reverse stamping techinique, I filled each petal of the flower with different colours of the spectrum. I used bright pastel colours for a more saturated result.


I created some handmade sticker.
I used a plastic sheet or bag and a clear polish.
Here is a step by step explanation:

1. Paint a rectangular shape using the top coat on the plastic folder. Let it dry.

2. Now that the top coat is dry you can stamp on it. I stamped the rose design with a black polish.

3. Fill the design with some acrylic paint or nail polish. I used the colours of the rainbow and I filled each petal with a different colour.
I covered the design with a light green shade to fill in any gap.

4. When all layers are dry, carefully peel the sticker off the plastic folder. Now the sticker is ready to be applied

5. Dab a bit of clear top coat onto the nail and place the design, press it down, start in the middle then press toward the edges.

6. Add a layer of top coat on the nail, the polish will make the decal shrink a bit, get rid of the eccess of the decal.

Here is a small video where I show you some steps of the process: